The 802.1x wire lab
Operation Summary
Today I tested 802.1x
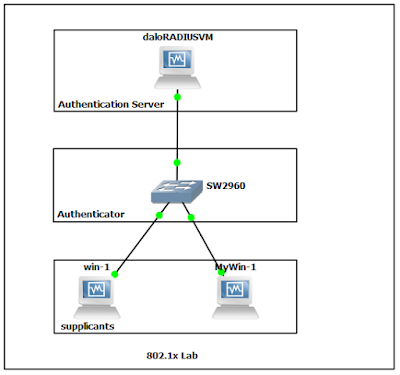
lab with cisco 2960 switch as Authenticator, DaloRadius as Authentication
Server and Two window 7 clients as supplicant. Although EAP support different
kind of authentication mechanisms, I use simple username and password
authentication for lab.
Server
configuration
Installing Free radius
[root@radius
~]# yum -y install freeradius freeradius-utils freeradius-mysql
|
Enable freeradius with below commands after successful
installation.
[root@radius
~]# systemctl start radiusd
[root@radius
~]# systemctl enable radiusd
|
Check the service status
[root@radius
~]# systemctl status radiusd
|
Start and enable firewalld
[root@radius
~]# systemctl enable firewalld
[root@radius
~]# systemctl start firewalld
[root@radius
~]# systemctl status firewalld
|
Add permanent rules to default zone to allow radius service.
[root@radius ~]# firewall-cmd --add-service=radius
--permanent
|
Reload firewalld and confirm radius service was in default
zone
[root@radius
~]# firewall-cmd –reload
[root@radius
~]# firewall-cmd --list-services --zone=public
|
Configure freeradius to create client and user for
testing lab.
Add the subnet address to receive authentication
requests (192.168.0.0/24) in “/etc/raddb/clients.conf”
client
192.168.0.0/24 {
secret = cisco
shortname = switch
}
|
Define a user/password combination for testing. I've
created the user kpps with the password Secret and another user test with the
password Test. Can pick your own username and password, but it need to maintain
the spacing in the configuration file “/etc/raddb/users”.
kpps
Cleartext-Password
:= "Secret"
Reply-Message = "Hello,
%u"
test
Cleartext-Password
:= "Test"
Reply-Message = "Hello,
%u"
|
After changed configuration, need to restart radius service.
Also check the service status.
[root@radius
~]# systemctl restart radiusd
[root@radius
~]# systemctl status radiusd
|
If you want to see the processes more details please
run radius service with debug mode.
[root@radius
~]# systemctl stop radiusd
[root@radius
~]# radiusd -X
|
Switch
Configuration
As primary step, establish connection between radius
server and switch.
switch(config)#interface
vlan2
switch(config-if)#ip
address 192.168.88.31 255.255.255.0
switch(config-if)#no
shutdown
switch(config-if)#interface
GigabitEthernet1/0/1
switch(config-if)#switchport
mode access
switch(config-if)#interface
GigabitEthernet1/0/2
switch(config-if)#switchport
mode access
switch(config-if)#interface
GigabitEthernet1/0/3
switch(config-if)#switchport
mode access
|
Enable Authentication, Authorization, and Accounting
(AAA) for the switch and point to radius server (192.168.88.137).
switch(config)#aaa
new-model
switch(config)#
radius-server
host 192.168.88.137 auth-port 1812 acct-port 1813 key cisco
|
Configure AAA to reference the RADIUS server for
802.1X authentication and accounting requests.
switch(config)#
aaa
authentication dot1x default group radius
switch(config)#aaa
accounting dot1x default start-stop group radius
switch(config)#interface
GigabitEthernet1/0/2
switch(config)#authentication port-control auto
switch(config)#dot1x
pae authenticator
switch(config)#interface
GigabitEthernet1/0/3
switch(config)#authentication port-control auto
switch(config)#dot1x
pae authenticator
switch(config)#do
wr
|
Testing
Configure static ip address for two window clients.
Configure 802.1x client authentication
1) Run
> services.msc > Wired AutoConfig, right click and start the service.
2) Control
Panel > Network and Sharing Center > Change adapter settings >
Interface Properties > Authentication
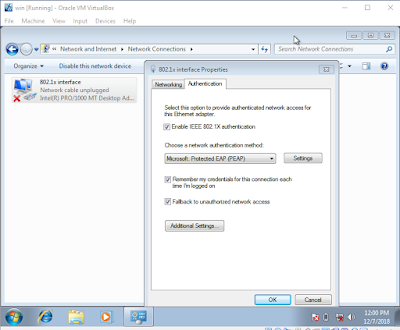
3) Choose a network authentication method: Settings
configuration was as follow
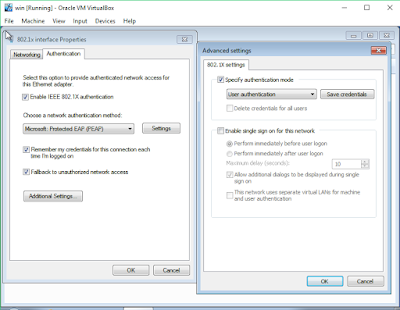
4) Additional Settings was as follow was as follow
5) And set username and password that were configured in
radius users config file under “Save credentials”
Result
I transfer file between two client and got the result as follow.
Network Config helped by my senior bro!
Thank you!


Comments
Post a Comment